
[iot][arduino][breeding]Arduinoで水槽の温度管理
安価なマイコン基盤であるArduinoを使って、水槽の温度をクラウドサービスを利用してモニタリングし、さらに一定の温度から外れるとアラートをメールしてくれるシステムを作りました。
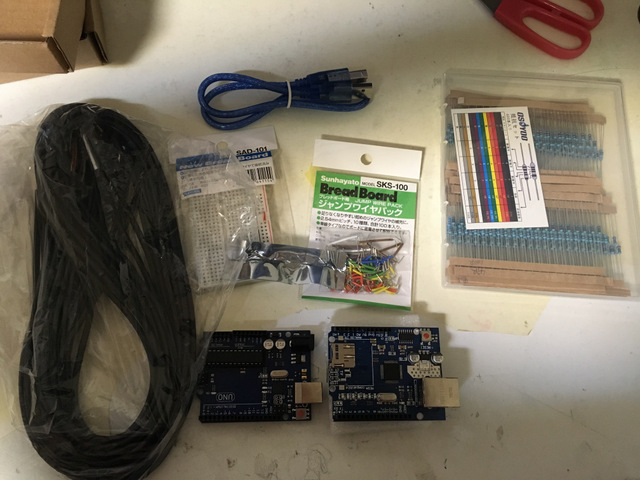
購入したのは、以下の機材
・Arduino Uno (のクローンの安物、1,000円程度)
・Ethernet Shield for Arduino Uno (のクローンの安物、1,500円程度)
・温度センサー DS18B20
・ブレッドボード
・金属皮膜抵抗器
・ジャンプワイヤキット
ブレッドボードにセンサーの三芯線とArduinoの5V電源、GRD、デジタル入力からのジャンパ線を刺し、サンプルのスケッチを参考に手直しを加えたら完成。
今のところ、室温と4つの水槽の水温(=5つの温度プローブ)を5分ごとに取得し、これをAT&Tのクラウドリソース、m2xにアップロードし、モニタリングしています(実際のサイト)。設定温度から上下1℃以上変動すると、Herokuに置いたアラートが作動してラボのメンバーにメールが通知されるようになっています。今のところ設置してから二か月以上、安定して動作しています。
スケッチは下記のもの。いろいろ試行錯誤した結果、MSTimer2を利用するのが最も安定しているようです。
#include <MsTimer2.h>
#include <SPI.h>
#include <Ethernet.h>
#include <OneWire.h>
#include <DallasTemperature.h>
#define TEMPERATURE_PRECISION 12
#define ARDUINO_PLATFORM
#include "M2XStreamClient.h"

// MAC address for your Ethernet shield
byte mac[] = { NICのMACアドレス };
// Set the static IP address to use if the DHCP fails to assign
byte ip[] = { NICのIPアドレス };
byte dns_adress[] = { DNSアドレス };
byte gateway[] = { ゲートウェイアドレス };
byte subnet[] = { サブネットマスク };


char deviceId[] = "m2xのデバイスID"; // Device you want to push to
char m2xKey[] = "m2xのキー"; // Your M2X access key
char streamName1[] = { "temp01"};
char streamName2[] = { "temp02"};
char streamName3[] = { "temp03"};
char streamName4[] = { "temp04"};
char streamName5[] = { "temp05"};

const int temperaturePin = 0;
EthernetClient client;
M2XStreamClient m2xClient(&client, m2xKey);
#define ONE_WIRE_BUS 2

OneWire oneWire(ONE_WIRE_BUS);
DallasTemperature sensors(&oneWire);
DeviceAddress temp0 = { DS18B20のデバイスアドレス
例 0x28, 0xFF, 0xB0, 0xA5, 0x8C, 0x16, 0x03, 0x54 };
DeviceAddress temp1 = { };
DeviceAddress temp2 = { };
DeviceAddress temp3 = { };
DeviceAddress temp4 = { };


void setup() {
  sensors.begin();
  sensors.setResolution(TEMPERATURE_PRECISION);
  Serial.begin(9600);
  Ethernet.begin(mac, ip, dns_adress, gateway, subnet);
   //300000ms毎に記録
  MsTimer2::set(300000, timerRecord);
  MsTimer2::start();

  //while (!Serial) {
  //  ; // wait for serial port to connect. Needed for Leonardo only
  //}
}

void timerRecord() {

//  Serial.println("Connected to Ethernet");
//  printEthernetStatus();

  float temp01, temp02, temp03, temp04, temp05;
  sensors.requestTemperatures();

  temp01 = sensors.getTempC(temp0);
  temp02 = sensors.getTempC(temp1);
  temp03 = sensors.getTempC(temp2);
  temp04 = sensors.getTempC(temp3);
  temp05 = sensors.getTempC(temp4);

//  Serial.println(sensors.getTempC(temp0));
//  Serial.println(sensors.getTempC(temp1));
//  Serial.println(sensors.getTempC(temp2));
//  Serial.println(sensors.getTempC(temp3));
//  Serial.println(sensors.getTempC(temp4));

  int response1 = m2xClient.updateStreamValue(deviceId, streamName1, temp01);
  int response2 = m2xClient.updateStreamValue(deviceId, streamName2, temp02);
  int response3 = m2xClient.updateStreamValue(deviceId, streamName3, temp03);
  int response4 = m2xClient.updateStreamValue(deviceId, streamName4, temp04);
  int response5 = m2xClient.updateStreamValue(deviceId, streamName5, temp05);
// Serial.print("M2x client response code: ");
// Serial.println(response);

  delay(10000);
}


void printEthernetStatus() {
  // print local IP
  Serial.print("Local IP: ");
  Serial.println(Ethernet.localIP());

  // print subnet mask
  Serial.print("Subnet Mask: ");
  Serial.println(Ethernet.subnetMask());

  // print gateway IP
  Serial.print("Gateway IP: ");
  Serial.println(Ethernet.gatewayIP());

  // print dns IP
  Serial.print("DNS IP: ");
  Serial.println(Ethernet.dnsServerIP());
}

void loop(){}
2019/10/9 追記:
複数(当方の場合、5つ以上)のDS20B18のコードを延長して接続するとエラー値が頻発してしまうが、これはどうも延長したり複数繋ぐとDS20B18自体が抵抗となってしまい、通常の4K7の抵抗を入れると電圧が高くなりすぎる、あるいは電流が微弱になって読み取れなくなるらしい。その場合、抵抗を低いものに変えるとうまく行く(今回は2K2の抵抗に交換)。この現象はarduinoの個体差や配置する環境によっても異なるらしく、原因がわからずに1年ぐらいトラブルシュートに時間がかかってしまった。